
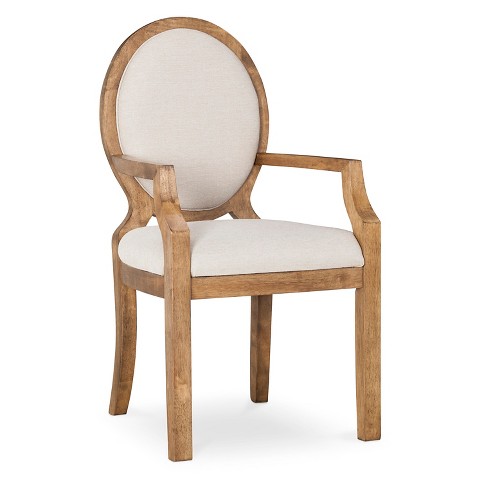
Thank goodness it’s Friday! We have a busy week and a half ahead of us with Evey’s 4th birthday, Thanksgiving, and my little’s sister’s 30th birthday so definitely had to be extra productive this week! I’ve been scrambling around with my to-do lists and making sure we’ll have all that we need. For Evey’s party, as well as Thanksgiving, we are having all our closest friends and family to celebrate, which I’m so looking forward to! But my biggest concern for these gatherings are: “Where will everyone sit?!” I’ve been eyeing these dining chairs from Target for a while now but at $100 a pop, there’s no way we can afford to get these, especially since it’s the holidays!
Aren’t they awesome?! But since we can’t afford it, I’ve decided to make a bench instead! I’ve seen plenty on Pinterest to help with my creativity but I just don’t have time to get all fancy with it. So today, I’m going to share with you how I made this REALLY simple bench! I spent only $12 on this but I’m sure you can make one for less than $30 in lumber. We had these old 8′ 2×12’s laying around from our yard because we removed it from an old garden the old homeowners used to have. Some of them were in pretty rough condition.


I originally wanted to make a “Welcome” sign with is but thought that we needed a bench more than a sign, haha. I went down to Home Depot and grabbed some 4×4’s ($12) and asked them to cut it down to 16″ lengths. Make sure the post is straight and as little imperfections as you can find. I was able to get 6 pieces out of it but saw that one of them was a smidge shorter than the others. So I decided to just do 4 legs, instead of 6. (I wanted to do 6 for extra support but since the board is really rigid, I figured I only needed 4.)
Other things you will need: A power drill with phillips head bit and a drill bit to pre-drill the holes, 3″ nails, sander/sand paper, stain/paint, protective/safety gear.
I started off with sanding the legs and the 2×12 board that I had. If you are buying a new board and it’s in great condition, it will take you less time sanding and you might not need a sander like I did. Because the board I have is in rough condition, I had to sand for a good hour before I was OK with it for kids to sit on it. Once everything is smooth the way I wanted it, I just stacked the legs side by side and then put the board on it. I just made sure it looked even from each side.


Then all I did was pre-drill the holes from the top and screwed the nails in, 2 nails per leg. I went in with the sander again with a fine grit sandpaper just to make sure ain’t nobody gonna get splinters from sitting on my bench, haha. Then it was ready to be stained. I always flip it over and start at the bottom first when I stain or paint. Once I am done with that, I flip it right-side up and stain the top. If you are not going for the wooden, rustic look, you can always paint it to match your decor.


I let it sit in the garage for a couple days to air out the fumes from the stain. Now, the bench is in our dining room, ready to be used for the parties! So easy and simple! If I bought a new 2×12 board, I wouldn’t have spent so much time on it but that’s what I get for wanting to be cheap, haha! I have to put in extra elbow grease. But for what it is, it was so worth it. Now I have extra seating for 4-5 people in our dining room. Imagine I bought the chairs? That’s close to $500! The weight has been lifted from my shoulders and now I’m just ready to party and have fun with the kiddos! Here is the bench in our dining room:


It fits right in! That’s it for this week, guys! I hope the weather is gorgeous wherever you are and that life is good, and I hope you’re enjoying every bit of it! Til next time!
Stay lovely,
Jeap